Whether you are having a few friends over or hosting the next holiday party for your family, a charcuterie board is an easy and impressive appetizer to prepare. I really enjoy preparing and of course, eating, a charcuterie board! It looks fancy and leaves a “Wow!” factor on your guests. A charcuterie (pronounced “shahr-ku-tuh-ree”) board is essentially a cheese and meat platter that has a variety of both, along with nuts and spreads, arranged on a tray. It is really easy to assemble and the cost of goods does not have to break your wallet. You may already have just about everything you need in your fridge and pantry.
The core of the board
So, what exactly goes on a charcuterie board? As you are planning on what you need to buy for your board, you want to keep it simple or else it can get pretty complicated. Make sure to have these 6 main items in mind:
- cold cut meats
- cheeses
- fruits/veggies
- jams/spreads
- crackers/breads
- nuts
As you are writing your grocery list, I would write each of these as main bullet points, and from there, pick out 1-3 items for each category. I will walk you step by step on how to pick out your items. Let’s start building! (How to video down below as well!)
Accessories
To start building your charcuterie board, you will need to place everything onto a board of some sort, ramekins or small bowls, and cheese knives. For the board, you can buy an inexpensive cutting board, use a cookie baking sheet that most of us have at home already, or you can find a platter that is meant and designed for cheeses (slate or marble). You can find any of these at your local retailer like Homegoods or TJ Maxx (my two favorite stores) to keep it price friendly. Honestly, any medium-large platter will do. I use a cutting board that I purchased at Ikea that cost me around $14 but there are so many options that are under $10. The ramekins or small bowls will be used for nuts, spreads, jams, or anything of your preference. It gives a nice height and dimension to your board.
For the cheese knives, these have come in handy for me and are totally worth it! You can find them sold in a set at the stores mentioned above or you can buy a board that already comes with them, which is what I have. A two in one? Total Steal! Each knife has its purpose and makes a world of difference when you are working with different cheeses. Let’s go over them:
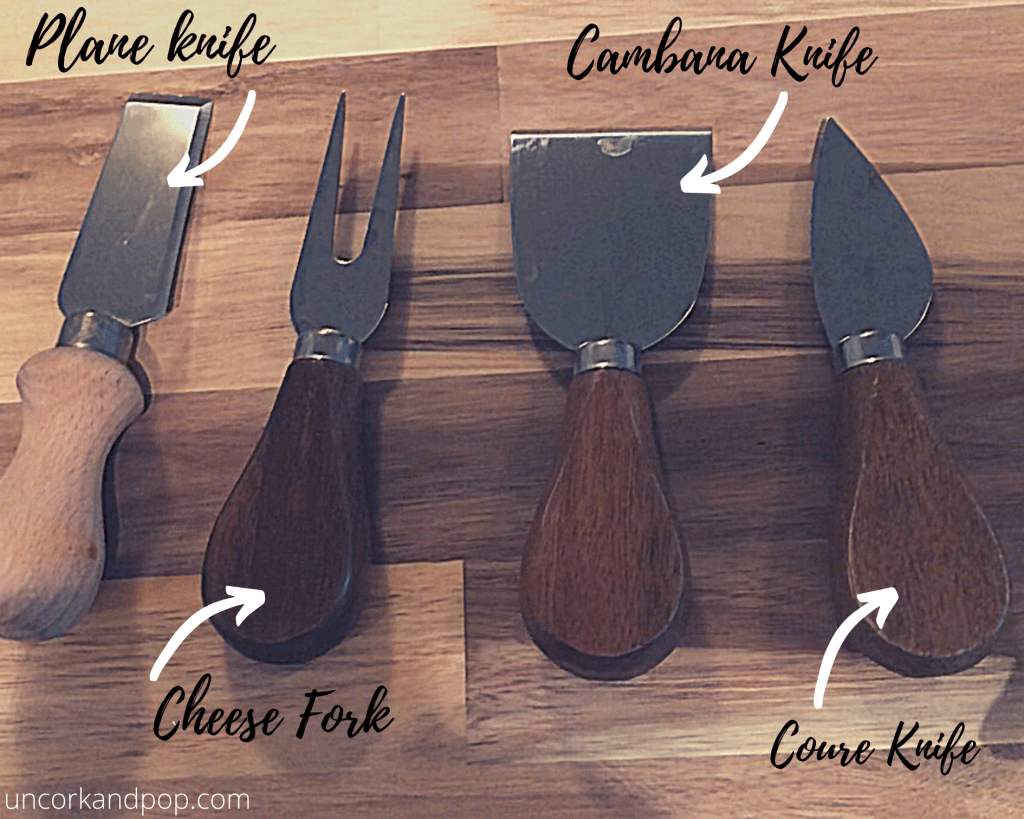
Plane knife: this knife is perfect for cutting semi-firm cheeses like Cheddar and Provolone.
Cheese fork: perfect for keeping blocks of cheese in place while slicing or for serving and grabbing cheese slices. It is best for semi-soft to hard-cheeses like Gouda.
Campana knife: this one works well with harder cheeses like Parmesan, Asiago, and Gruyere and cuts or shaves them easily. You can also use it for crumbing cheeses like Blue cheese and Feta.
Coure knife: this one easily removes the rind in cheeses like in parmesan. It works great as well as cutting up the harder cheeses (parmesan, aged cheddars, and aged manchego) into cube size bites.
Meats
The classic cured meats for your board will be Prosciutto, Salami, Coppa, Pancetta, and cured sausages (Chorizo and Soppressata). For my board, I used a Genoa Salami and a traditional style Prosciutto. If these meats are intimidating or you are not a fan of the taste of them, you can go as simple as using Pepperoni, sliced turkey, and thick ham cubes. Having meats that are on the saltier side is beneficial to the wine that you may be drinking. If your wine is high in acid, the salt will mellow out that acidity.
Cheeses
Oh, this part is my favorite. Who doesn’t love cheese?! So this part might be lengthy. Even for my lactose intolerants, you won’t be left out. You can enjoy aged and harder cheeses, like Parmesan and Swiss, since there are lower traces of lactose in them due to the aging. The reason why having cheese on your board is so important is because it can give you and the wine you are pairing with an experience. If you are drinking a high tannic red wine, the fats from the cheese will cut through the tannins and result in your wine being smoother. If you are drinking a high acid white wine, the wine will appear to be creamier.
When picking out your cheeses, you want to have a variety of soft, semi-soft, semi-hard, and hard cheeses. All the different textures will give a different experience to the meats and wine you will be paring with. I like to pick out my cheeses from the cheese shop at my grocery store but if you are a beginner and a little hesitant to pick out funky cheeses, do not worry, you can get whatever you are most comfortable with. An aged Cheddar, Colby Jack, or Mozzarella will work perfectly!
These are the 4 cheeses that I chose when I made my board. I also usually like to include a Brie (soft-cheese) or a gouda that is made from goat’s milk called Midnight Moon (semi-hard) but I did not include them this time around.
Semi-soft cheese: Sartori Merlot Bellavitano
This is heaven! A little creamy, a little hard with that perfect amount of cheese crystals. It is a blend of Cheddar and Parmesan that has been dipped and soaked in Merlot wine, so you get two perfect worlds in one. This brand in general is my favorite and they have an array of flavors and types to choose from. It is so much my favorite that I ate it before I even got to make the board itself (oops!) and that is the reason why it’s not shown in the picture above. I usually like to alternate and try new flavors but I always go back to the Merlot. Definitely check out this brand the next time you are in your grocery store at your deli/cheese shop.
Semi-hard cheddar: Beecher’s Flagship
This cheddar has been aged for 15 months and it is rich and creamy with those awesome cheese crystals that occur during aging for a slight crunch.
Semi-soft: Manchego
I LOVE this Spanish cheese! I came across this trio which is awesome because it has a slice of each of goat, sheep, and a mix (cow, goat, and sheep) milk. Being able to try each one was a cool way of comparing side by side the different flavors it had depending on the milk it was used. Each one respectively gave a different experience with the Rioja Reserva I was drinking that night.
Soft cheese: Honey Goat cheese
Okay, so I have a confession. I just admitted that I LOVE Manchego and I also have no self-control when it comes to the Sartori Merlot cheese, but I TRULY love goat cheese. It is probably one of my favorite kinds. There is something about its creaminess, kinda tangy, kinda sweet flavors that just melts into one utopic experience. I love it on my pizzas, I love it on my breakfast skillet hash, and I just love it on a cracker. So, with that being said, you can find goat cheeses that are either plain, infused with honey like the one I have on my board, or even some with herbs for a more savory take. This cheese goes great with drizzled honey, or topped with a jam or fruit spread.
Soft Cheese Spread: Alouette Garlic and Herbs
I know I said I had only 4 kinds of cheeses and I know this is the 5th one listed. But since the Merlot cheese did not make it, this is technically my 4th cheese. So this is more of a spread that resembles a thick and fluffy cream cheese with garlic and herbs and it is DIVINE! It is so dangerous that I may have finished a tub one night by myself, and I am not ashamed of it (treat yo’ self!). Once it gets to room temperature it is a lot easier to spread onto a cracker. They also offer different flavors but this is my go-to.
Fruit and Veggies
Adding fruits and vegetables add color to the board that makes things pop out. They also cut the saltiness from the meats and cheeses and add either a little sweetness or a refreshing crunch. Some great options for fruits include grapes, figs, strawberries, blueberries, blackberries, and dried fruit like dried apricots and dates. I usually always have blueberries and strawberries in my fridge so I just used those. For your veggies: carrots, celery sticks, cucumbers, sliced peppers, olives, and pickled veggies are all great to include!
Jams and Spreads
Including fruit preserves, especially if a Brie or goat cheese is on the board, adds a nice break to all the salt from the meat and cheeses and brings a balance of flavors. Mint jelly, apricot jam, or a fig spread (my favorite and what I paired with my goat cheese) are all great options. If you are feeling a little adventurous, you can add a spicy mustard to your board.
Crackers and Breads
This part should be a piece of cake! There are so many options when it comes to crackers and breads to choose from. Literally any, and I mean ANY kind, will do just fine! Some of the classic and traditional types are water crackers, pita chips, bagel chips, crostinis, breadsticks, sliced baguettes, and any artisanal crisps. But the world is your oyster in this category. I try to find a box that has an assortment of crackers because variety is key! And it is usually a great bang for your buck.
Nuts
Last but not least, nuts! I typically keep a bag with an assortment in my pantry so that’s what I used on my board this time around. Almonds, pistachios, cashews, macadamias, and Spanish Marcona almonds (YUM!) are some good options.
Assembling the board
When putting your board together, it’s all about placement and playing around where items go. I like to start by putting any small bowls or containers (to fill either your jams, nuts, olives or pickled veggies) onto the board first. I love things to be symmetrical to each other so keep that in mind. Once you have your bowls in their places, add your meats, cheeses, and crackers to fill in the spaces. Remember, SYMMETRY! Fill in any empty spots with your fruits and veggies. There is no right or wrong way to build a charcuterie board. Just play around with the placement of everything and have fun with it!!
I hope you found this easy for the next time you want to have a girls night in or host a dinner party. You will not disappoint your guests and they will be left impressed!
Bon Appetit!
